
🧝🏻 Gnome Shell Extension for Internal Media Dispatch
- 26 minsTable of Content
Introduction
Because of the heavily secured system at Sony Pictures, no one is allowed to upload media (files, photos, recordings, etc.) to any external website, including Google and all its services. However, there are also many artists that needs visuals (screenshots, videos) to communicate effectively. One project that has been proposed for a long time is an internal tool that allows employees to send screenshots/recordings fast and conveniently.
I didn’t know much Javascript and didn’t even know what a Gnome Shell extension is before this project. I was assigned to research in this area and create an extension to solve this problem.
Structure
The architecture of this extension system is very simple - a server, a listener, and an extension. The server is an ActiveMQ server, an open source, multi-protocol message queue server. The listener is written in Python using the stomppy API, which was later updated to use the internal wrapper API that I wrote for the company. The Gnome Shell extension is a application, written in Javascript, that is attached to the desktop environment Gnome and able to process more customized features that should not be in the Linux core. In conclusion, we have three main components in this iteration:
We will also talk about the relationships between JS extension - Python Listener
Javascript Gnome Shell Extension
This extension is written in a specific implementation of pure Javascript, GJS, which is a Javascript binding for Gnome Desktop Environment. Gnome shell extensions can help the desktop environment manage or customize applications, UI, widgets by integrating into the Gnome interface itself. They are connected to the Gnome shell and is designed to extend the functionality of Gnome DE.
To create an extension, developers would just have to follow these simple steps:
- Add an extension folder at
~/.local/share/Gnome-shell/extensions/or/usr/share/Gnome-shell/extensions/. - In the folder, create the following files
metadata.jsonextension.js-
prefs.js(optional - for GTK extension settings) -
stylesheet.css(optional - for styling)
- In
metadata.json, add your extension configuration. This lets the Gnome DE know what/how to add your extension to the DE. It should look similar to this:{ "url" : "", "uuid" : "extension@extension.com", "name" : "extension name", "description" : "description", "shell-version" : [ "3.28", "3.32" ], "version" : 1.0 } -
extension.jsis the main script that designs the logic, UI, I/O, etc. of the extension. There are three functions that the Gnome DE looks for when running the file:
function init () {
    // initialize any variables / functions
}

function enable () {
    // triggers when the extension is enabled and added to the DE
}

function disable() {
    // triggers when the extension is disabled and removed from the DE
}
Then, the extension is basically set up! The GJS Tutorial and GJS Documentation have many useful tips and resources.
Python Listener
The Python listener is built around the stomppy API, which is the first component that the extension interacts with in the hierarchy of the message queue system. We specify the server and the topic we want to listen to, which is ActiveMQ and a topic we set up for this application, in this case. Whenever a message is pushed to the destination topic from the publisher, the listener will pick up the message and decide what to do with it. The listener basically acts like a infinite loop with functions being called when there are incoming messages from the queue.
In the original version, before the wrapper API has been developed, I used something similar to the following.
import stomp

# Sender
conn = stomp.Connection()
conn.connect('admin', 'password', wait=True)
conn.send(body=' '.join(sys.argv[1:]), destination='/queue/test')
conn.disconnect()

# Receiver
c.subscribe('/queue/test', 123)
ActiveMQ Server
The ActiveMQ server is the server the Python listener and publisher connects to. It is an open-sourced, Java-based message broker that supports software/hardware integration in multiple languages and frameworks. It is also used in a lot of IoT devices and large scale cross platform projects.
JS extension - Python Listener Relationship
When a machine starts, Gnome starts, along with all the enabled Gnome shell extensions. When we initialize the extension, we also run the Python listener using
process = Gio.Subprocess.new(['python', LISTENER_PATH], 0);
process.wait_async(null, null);
This basically runs the Python listener in a new process asynchronously using wait_async, a asynchronous version of Gio.Subprocess.wait(). We use process.force_exit(); when the extension is disabled, to make sure there isn’t any dangling processes running around.
In the this version of the extension, whenever the Python listener receives a message from the queue/server, it writes to a JSON file. The extension, on the other hand, reads the the JSON file every 1 second and determine if there is a new message. We use Gio.file_new_for_path to get the file from path and Gio.File.load_contents_async to read the file asynchronously, since synchronous read/writes would create an even larger computational load to Gnome shell and the machine.
let file = Gio.file_new_for_path(JSON);
file.load_contents_async(null, function(file, res) {
    try {
        contents = file.load_contents_finish(res)[1];
        try{
            contents = JSON.parse(contents);
        } catch(e) {
            log(e);
        }
    } catch (error) {
        /* Error will only occur if file doesn't exist or has been corrupted somehow */
        log(error);
    }
}
Notice that there are a lot of reading/writing going on, and there is a JSON file in between, which is definitely not the best way to do it. I had to pay a lot of attention to locking the file to prevent race conditions, limiting the file size so that I/O doesn’t take too long, parsing the JSON and a whole lot of other issues that come with file I/O. The extension also has to read from a JSON file every RATE seconds, which creates a huge load on the extension, and subsequently on the Gnome shell itself. This problem will eventually be improved, or eliminated, shall I say, with the DBus Connection.
UI/UX Design
UI/UX design for a Gnome shell extension is quite different than Qt, which I am fairly experienced in from writing/debugging plugins in Sony Pictures Imageworks. This is the structure of a Gnome shell extension and the packages/toolkits that contribute to the UI of it.
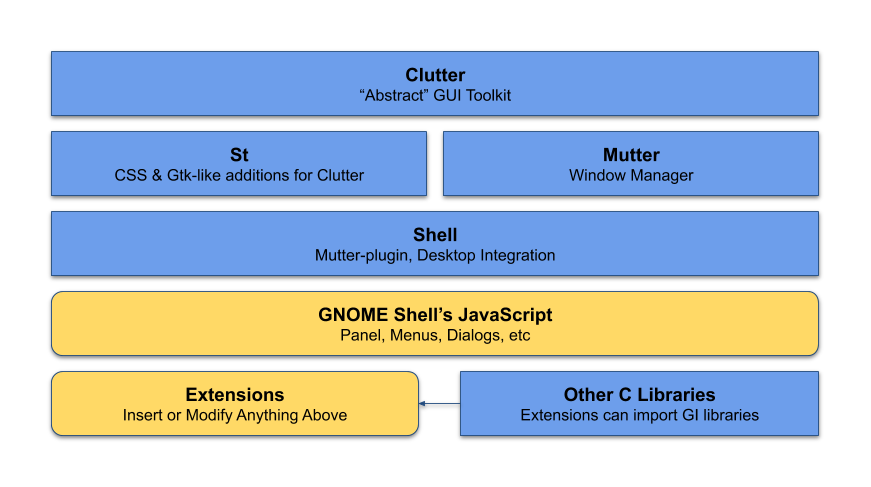
For a Gnome shell extension, it is most convenient to inherit existing UI components and make modifications from there. Developers can definitely design their own UI components, but it requires a lot more work, might be incompatible with Gnome shell itself, or buggy if not designed properly. Gnome shell itself is built with those UI components, and it is an open source project. All of the components are written in GJS and located here. The most popular UI component for extension development is the PopupMenu, which is perfect for a popup widget in the taskbar.
Application Overview
Logic
Laying the foundations (setting up the extension, understanding gnome shell itself, UI design) took up most of the time through out the project. The goal for this application is simple: to allow users to send screenshots or recordings to each other on their Linux machine. We didn’t even have to actually “send” the media, we just have to store it somewhere on the common disk space where everyone has access to it, and just send the path to the receiver. The receiver receives the package in a string format, which consists of the sender, the path to the media, the timestamp and the list of receivers. Every user will receive the package from the listener, because they are connected to the same topic from the same server. They will parse the package individually and only notify (add the notification) if their userId is in the list of receivers.
Like I mentioned above, the extension backend runs the following refresh() function to check for new message every RATE seconds, where RATE is a global constant representing the refresh rate.
_refresh : function(){
/* Set timeout to null and remove it from the Mainloop */
if (timeout) {
Mainloop.source_remove(timeout);
timeout = null;
}
/* Reinitialize timeout and bind it to recall refresh every RATE seconds */
timeout = Mainloop.timeout_add_seconds(RATE, Lang.bind(this, this._refresh));
/* Check Messages */
checkMessage();
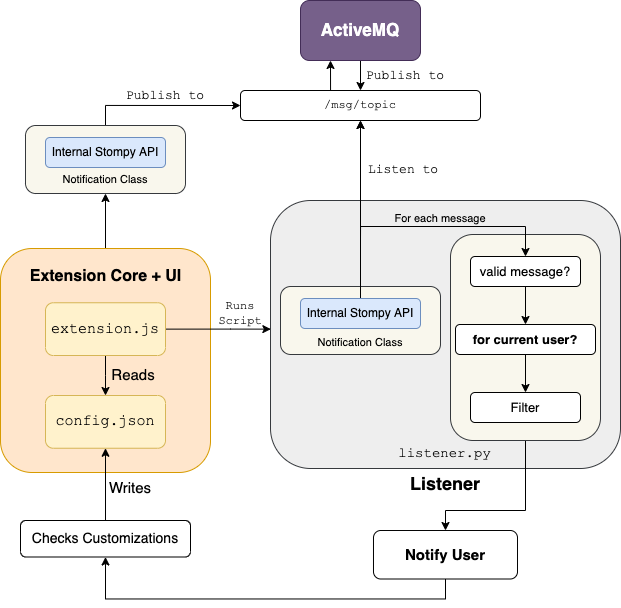
}This is the system level diagram for this application. The components and relationships in this graph is covered in the sections above.
UI
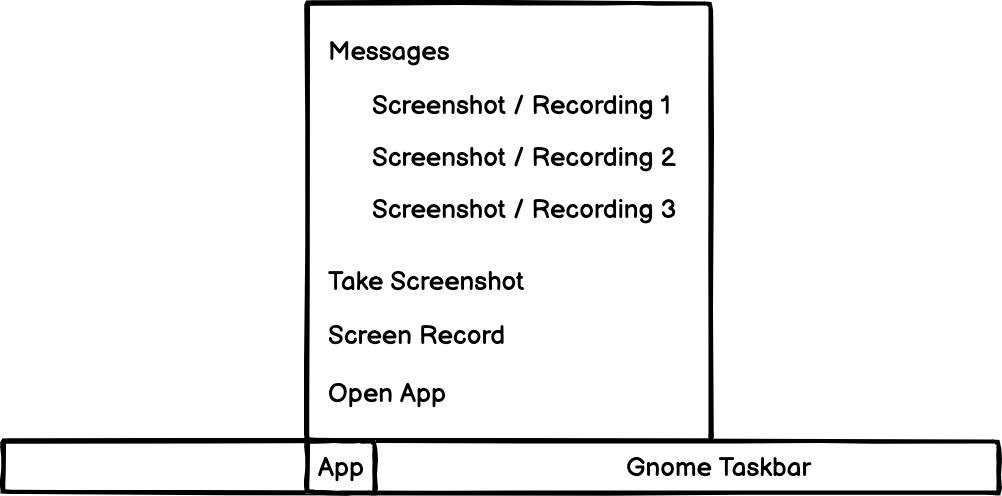
I used the default popupMenu developed by Gnome, and just stacked the buttons in the menu. It is not the prettiest UI, but it took very little time to finish it and got the job done. The wireframe of the extension is shown below. In this iteration, it only stores three messages because we didn’t set up a scrollable area where we can store hundreds of notifications. This is partly because it involves pretty intensive code change and development in Javascript, which I just started learning at that time. Other reason is that, with the current logic (reading/writing new messages to/from a config file), allowing more messages equals more load on each Linux machine, which might affect the performances of other processes. These problems will also be solved in this iteration of the extension.
Results
Extension Usage Monitoring
To obtain the usage of extension, I wrote a Python cron-job script to count the total number of media objects sent on that day, and push the data to a Google spreadsheet. That script is ran every day using crontab. We connect the Google spreadsheet to Google Data Studio and plot the data, including daily/total media sent, daily/weekly/monthly users, new users, etc. The Data Studio portal will also be updated every day, since it is linked to the Google spreadsheet. In that way, management will be able to easily access the usage and performance of this application.
Numbers
The number of users using this extension quickly grew and scaled up really fast. The extension was pushed to production October 2021 and as of May 14th 2020, a total of 2391 media objects have been sent from 178 users, averaging around 50 files sent per day in the past week. More importantly, this is just a small simple application that only supports sending/receiving media! I have added a lot more new features to the latest version and it will be pushed to production soon! I think it will definitely gather a lot more users 😀.